
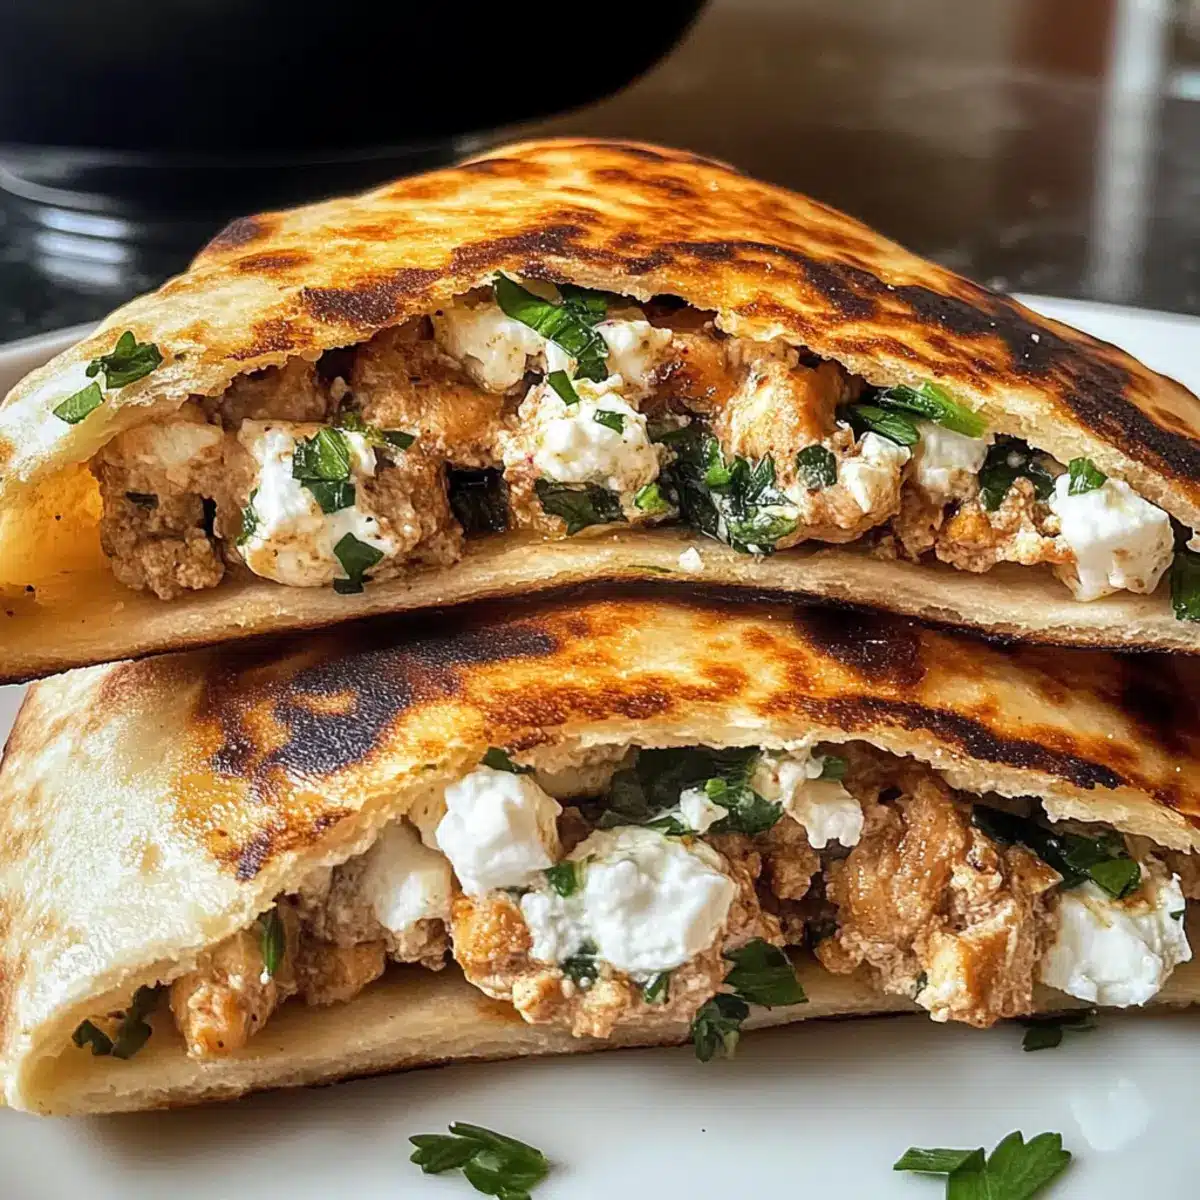
As I flipped through my favorite cookbook, a vibrant image of crispy pita pockets caught my eye, instantly transporting me to the bustling streets of the Middle East. This Crispy Pita with Chicken & Feta recipe, known as Arayes, is the perfect solution for those busy weeknights when you crave something healthy and satisfying without spending hours in the kitchen. In under 30 minutes, you’ll create a high-protein delight that’s both filling and customizable to suit your tastes. Plus, the fresh herbs and creamy feta make each bite irresistibly inviting. Whether you’re entertaining friends or simply treating yourself, why not explore the delightful twists this recipe offers? Are you ready to indulge?

Why is this Crispy Pita a Must-Try?
Quick and Easy: You can whip up this dish in under 30 minutes, making it a perfect option for those hectic weeknights.
Customizable Options: Feel free to swap ingredients like ground chicken for turkey or try a vegetarian twist with mushrooms, keeping your meals exciting.
Crowd-Pleasing Flavor: Imagine the delightful combination of crispy pita and creamy feta that’s sure to wow your guests, just like the mouth-watering Fried Feta Rolls.
Healthy & High-Protein: Each serving packs a protein punch, making it easier to maintain a healthy lifestyle without sacrificing taste.
Serve with Style: Pair your crispy pita with tzatziki or a refreshing Greek salad for a well-rounded meal that everyone will love!
Crispy Pita with Chicken & Feta Ingredients
For the Filling
• Ground Chicken – Lean, tender choice that serves as the main protein. Substitution: Use ground turkey for a different flavor or texture.
• Feta Cheese – Adds a creamy, tangy touch. Substitution: Goat cheese for a healthier twist or to enhance creaminess.
• Red Onion – Finely chopped for depth of flavor. Note: Should be firm with smooth skin for best taste.
• Garlic – Minced, provides aromatic depth. Tip: Use fresh, plump garlic for optimal flavor.
• Lemon Juice and Zest – Brightens the dish and adds freshness. Substitution: Lime juice can also work.
• Fresh Mint and Parsley – Adds refreshing notes and mild peppery flavor. Note: Fresh herbs yield the best flavor.
For Cooking
• Olive Oil – For frying, adds richness. Substitution: Can use avocado oil for a different profile.
• Pita Bread – Acts as the outer layer for filling. Note: Whole wheat pita can be used for a healthier option.
Step‑by‑Step Instructions for Crispy Pita with Chicken & Feta
Step 1: Prep the Filling
In a mixing bowl, combine ground chicken, crumbled feta cheese, finely chopped red onion, minced garlic, lemon juice, zest, and a handful of fresh mint and parsley. Mix thoroughly until all ingredients are well combined, then season generously with salt. This filling should be aromatic and cohesive, ready to stuff into the pita.
Step 2: Stuff the Pita
Carefully slice each pita bread in half to create pockets. Gently open each half and spoon in a generous amount of the chicken and feta mixture, being careful not to overstuff to prevent bursting during cooking. Press the edges securely to seal, ensuring the filling is enclosed.
Step 3: Pan-Fry the Pitas
Heat about two tablespoons of olive oil in a non-stick skillet over medium heat. Once the oil is shimmering, add the stuffed pita pockets. Cook for 3-4 minutes on each side until they turn a golden brown and are crispy, taking care to flip gently for even cooking.
Step 4: Optional Baking for Extra Crispiness
For an extra crispy finish to your Crispy Pita with Chicken & Feta, preheat your oven to 180°C (350°F) while the pitas are frying. After pan-frying, transfer the crispy pitas to a baking sheet and place them in the oven for 10-15 minutes. This will enhance their crunchiness, making each bite even more delightful.
Step 5: Serve Warm
Once cooked, let the pitas cool slightly on a wire rack for a minute, allowing steam to escape and keeping them crispy. Serve them warm alongside a bowl of tzatziki for dipping, elevating your crispy pita experience with a refreshing complement that highlights the flavors of the chicken and feta filling.

What to Serve with Crispy Pita with Chicken & Feta
Elevate your meal experience by pairing this delightful crispy pita with complementary sides and drinks that enhance its vibrant flavors.
-
Tzatziki Sauce: A classic dip made with yogurt, cucumber, and garlic. Its refreshing taste perfectly balances the richness of the filling.
-
Greek Salad: Bursting with juicy tomatoes, cucumbers, olives, and feta, this salad brings a fresh crunch that complements the warm pitas beautifully. The tangy dressing brightens every bite.
-
Roasted Vegetables: A medley of seasonal veggies, roasted until caramelized, adds depth and earthy flavors that pair harmoniously with the crispy pita.
-
Quinoa Tabouli: This grain salad, loaded with parsley, mint, and lemon, offers a light, zesty contrast to the savory filling of the pitas.
-
Hummus: This creamy dip made from chickpeas is a versatile option that brings extra protein and a lovely nuttiness, rounding out your meal perfectly.
-
Pineapple Mint Cooler: A refreshing drink that combines sweet pineapple with mint leaves. Its lightness complements the meal, providing a thirst-quenching finish.
-
Baklava: For a decadent dessert, serve this sweet pastry dripping with honey and nuts. The richness beautifully contrasts with the savory pita you just enjoyed.
-
Mint Tea: A soothing drink to linger over after your meal. Its warm, herbal notes soften the palate and transport you to Middle Eastern markets.
Crispy Pita with Chicken & Feta Variations
Dive into a world of flavors and textures by customizing this delicious recipe to suit your cravings!
-
Vegetarian Option: Swap ground chicken for roasted mushrooms or lentils. This hearty filling provides a satisfying, meat-free alternative that everyone will love.
-
Spice it Up: Add jalapeños or a spoonful of harissa for a spicy kick! The heat from these ingredients will add a delightful twist to your crispy pita, making it even more exciting.
-
Herb Swap: Replace mint with basil for a sweeter profile. Basil brings a lovely fragrance that complements the chicken and feta beautifully.
-
Cheese Variation: Use ricotta cheese in place of feta for a creamy texture. This variation offers a milder taste that’s perfect for those who prefer less tang.
-
Different Pita Types: Experiment with different pita bread like whole wheat or gluten-free options. Each will offer a unique flavor and texture, giving your dish a fresh spin.
-
Baked Not Fried: For a lighter version, skip the frying and bake your stuffed pitas. Bake directly until golden brown for a healthier alternative!
-
Add Veggies: Toss some spinach or diced bell peppers into the filling for an extra burst of nutrition. These add-ins enhance both flavor and color, making the dish even more visually appealing.
-
Crunchy Topping: Sprinkle sesame seeds or crushed pistachios on top of the pitas before baking. This provides an extra layer of crunch that elevates the overall texture of the dish.
Each variation allows you to unleash your creativity in the kitchen! Plus, if you’re looking for more feta inspiration, you may also enjoy these delightful Feta Fried Eggs or try your hand at Quesadillas with Spinach & Feta. Make it your own!
Make Ahead Options
These Crispy Pita with Chicken & Feta make-ahead options are perfect for home cooks who want to save time during busy weeknights! You can prepare the filling (ground chicken, feta, onions, garlic, and herbs) up to 24 hours in advance and refrigerate it in an airtight container. To keep the flavors vibrant and fresh, store the pita separately and assemble them just before cooking. When you’re ready to enjoy, simply stuff the pita, pan-fry for a few minutes, and for extra crispiness, finish with a quick oven bake at 180°C (350°F) for an additional 10-15 minutes. This way, you’ll have delicious, homemade crispy pitas with minimal effort, just as satisfying as if they were made fresh!
Expert Tips for Crispy Pita with Chicken & Feta
- Don’t Overstuff: Avoid overfilling your pitas to prevent them from bursting while frying. Keep the filling modest to achieve the perfect crunch.
- Heat the Oil: Ensure your olive oil is hot enough before adding the pitas for frying. This step is crucial for achieving that desirable crispy texture.
- Prep Ahead: Consider preparing the chicken and feta filling in advance, allowing flavors to meld. Store it in the fridge for up to 24 hours for easy weeknight cooking.
- Experiment with Herbs: Feel free to swap out mint for other herbs like oregano or basil, personalizing your Crispy Pita with Chicken & Feta to suit your taste preferences.
- Serve Immediately: These pitas are best enjoyed fresh and warm. If needed, keep them in a warm oven until ready to serve, maintaining their crispy appeal.
How to Store and Freeze Crispy Pita with Chicken & Feta
-
Room Temperature: Allow the crispy pitas to cool completely before store them in a paper bag for up to 1-2 hours. This preserves their crunch but is best for short-term enjoyment.
-
Fridge: Store leftovers in an airtight container for up to 3 days. If you plan to reheat, avoid stacking to maintain crispiness when warmed.
-
Freezer: For longer storage, freeze unstuffed pita bread in a zip-top bag for up to 2 months. Once ready, fill with chicken and feta, then cook straight from frozen, allowing extra frying time.
-
Reheating: To enjoy leftover Crispy Pita with Chicken & Feta, reheat in a skillet over medium heat for a few minutes on each side or in a preheated oven at 180°C (350°F) for about 10-12 minutes until heated through and crispy.

Crispy Pita with Chicken & Feta Recipe FAQs
What should I look for when selecting ingredients?
For the best flavor, choose firm and smooth red onions, as they have a deeper taste. Select fresh, plump garlic for maximum aroma, and ensure your ground chicken is lean and tender. Fresh herbs should be vibrant and fragrant, enhancing the dish’s overall freshness.
How should I store leftovers?
Store your leftover Crispy Pita with Chicken & Feta in an airtight container in the fridge for up to 3 days. It’s best to avoid stacking to keep the pitas crispy. If you’ve got some unstuffed pitas, you can freeze them in a zip-top bag for up to 2 months. Just remember to fill and cook them straight from frozen, adding extra frying time.
Can I freeze these pitas?
Absolutely! To freeze, let the unstuffed pitas cool completely, then place in a zip-top freezer bag. They can be kept for up to 2 months. When you’re ready to enjoy, fill them with the chicken and feta mixture while still frozen and cook them directly from the freezer, allowing an additional 2-3 minutes in the frying process.
What if my pitas are bursting while frying?
If your Crispy Pita with Chicken & Feta bursts while frying, it’s likely because they were overstuffed. Make sure to only fill them with a modest amount of the chicken mixture to prevent this. Additionally, sealing the edges securely can help keep everything enclosed during cooking.
Are there any dietary considerations?
Yes! If you have allergies, make sure to verify that your feta doesn’t contain any unwanted additives. For those with dietary restrictions, a vegetarian option can be created by substituting ground chicken with roasted mushrooms, lentils, or even chickpeas. If you’re cooking for pets, be cautious with garlic and onions as these can be harmful to dogs and cats.
Can I prepare the filling in advance?
Very! You can prepare the chicken and feta filling up to 24 hours in advance. Simply combine all the filling ingredients and refrigerate in an airtight container. This not only saves time but also allows the flavors to meld beautifully, enhancing the dish’s taste when you’re ready to assemble and cook your pitas.
Crispy Pita with Chicken & Feta: A Flavorful Protein Boost
Ingredients
Equipment
Method
- In a mixing bowl, combine ground chicken, crumbled feta cheese, finely chopped red onion, minced garlic, lemon juice, zest, and a handful of fresh mint and parsley. Mix thoroughly until all ingredients are well combined, then season generously with salt.
- Carefully slice each pita bread in half to create pockets. Gently open each half and spoon in a generous amount of the chicken and feta mixture, being careful not to overstuff to prevent bursting during cooking.
- Heat about two tablespoons of olive oil in a non-stick skillet over medium heat. Once the oil is shimmering, add the stuffed pita pockets. Cook for 3-4 minutes on each side until they turn a golden brown and are crispy.
- For an extra crispy finish, preheat your oven to 180°C (350°F). After pan-frying, transfer the crispy pitas to a baking sheet and place them in the oven for 10-15 minutes.
- Once cooked, let the pitas cool slightly on a wire rack for a minute. Serve them warm alongside a bowl of tzatziki for dipping.
Leave a Reply