
While rummaging through my pantry, I stumbled upon a treasure trove of flavors just waiting to be brought to life. Enter the Easy Samoa Brownies, a delightful twist on those nostalgic Girl Scout cookies we all adore. With a simple boxed brownie mix as our base, these treats come together in no time, making them a perfect solution for when a sweet craving strikes unexpectedly. Imagine layering gooey caramel and toasty coconut atop a rich, fudgy brownie—it’s a guaranteed crowd-pleaser that feels like a warm hug! Plus, these brownies are so easy to prepare; you’ll want to keep a batch on hand for last-minute gatherings or cozy nights in. Curious about how to whip up this chocolatey delight? Let’s get baking!

Why are Easy Samoa Brownies a Must-Try?
Decadent Delights: Each bite of these Easy Samoa Brownies delivers a luscious combination of chocolate, gooey caramel, and toasted coconut that satisfies any sweet craving.
Quick & Easy: Utilizing a boxed brownie mix means you can whip these up in no time, perfect for when you’re short on time but still want a homemade treat.
Crowd-Pleasing Flavor: These brownies take the beloved flavor of Samoa cookies and elevate them into a rich dessert that will impress friends and family at any gathering.
Versatile Topping Choices: Feel free to swap in dark chocolate or white chocolate chips, mix in nuts for added crunch, or try different toppings like peanut butter for a unique twist on this classic recipe!
Serve with Style: Pair these brownies warm with a scoop of vanilla ice cream or a dollop of whipped cream for an indulgent experience that will leave your guests begging for more.
If you enjoy these, don’t forget to check out my Tiramisu Brownies Decadent and Cilantro Lime Steak for more delicious treats!
Easy Samoa Brownies Ingredients
For the Brownie Base
- Boxed Brownie Mix – Provides the base and structure; adjust water, oil, and eggs according to package instructions.
- Vegetable Oil – Adds moisture and richness; can substitute with melted butter for a richer flavor.
- Eggs – Binds ingredients together and contributes to texture; do not exceed quantity recommended on the brownie mix package.
- Water – Hydrates the dry mix; use as directed on the box.
For the Toppings
- Shredded Coconut – Adds texture and flavor, creating a tropical taste; consider using unsweetened coconut for a less sugary profile.
- Caramel Ice Cream Topping – Provides sweetness and a gooey layer; can substitute with homemade caramel if preferred.
- Semi-sweet Chocolate Chips – For drizzling and enhancing flavor; dark chocolate or white chocolate chips can be used based on preference.
Now that you have all the Easy Samoa Brownies ingredients, let’s get magical in the kitchen!
Step‑by‑Step Instructions for Easy Samoa Brownies
Step 1: Preheat and Prepare
Begin by preheating your oven to 350°F (175°C). In a mixing bowl, combine the boxed brownie mix, water, vegetable oil, and eggs, following the package instructions. Whisk until smooth, ensuring no dry lumps remain. This rich batter will serve as the foundation for your Easy Samoa Brownies, so take a moment to mix thoroughly.
Step 2: Bake the Brownies
Pour the brownie batter into a greased 9×13-inch pan, spreading it evenly to the corners. Place the pan in the preheated oven and bake for about 30-35 minutes. The brownies are done when a toothpick inserted into the center comes out with moist crumbs—this ensures they remain fudgy and delightful, just like you want your Easy Samoa Brownies to be.
Step 3: Toast the Coconut
While the brownies are baking, prepare your toasted coconut. Spread shredded coconut in a single layer on a parchment-lined baking sheet. Toast it in the oven for about 3-5 minutes, stirring frequently until it turns golden brown. Keep a close watch to prevent burning—this nutty topping adds a wonderful crunch and flavor to your brownies.
Step 4: Cool the Brownies
Once baked, remove the brownies from the oven and let them cool in the pan on a wire rack. For quicker cooling, you can refrigerate them for about 15 minutes. This step is crucial—allowing the brownies to cool completely ensures that the layers will adhere properly when you add the toppings.
Step 5: Add the Caramel Layer
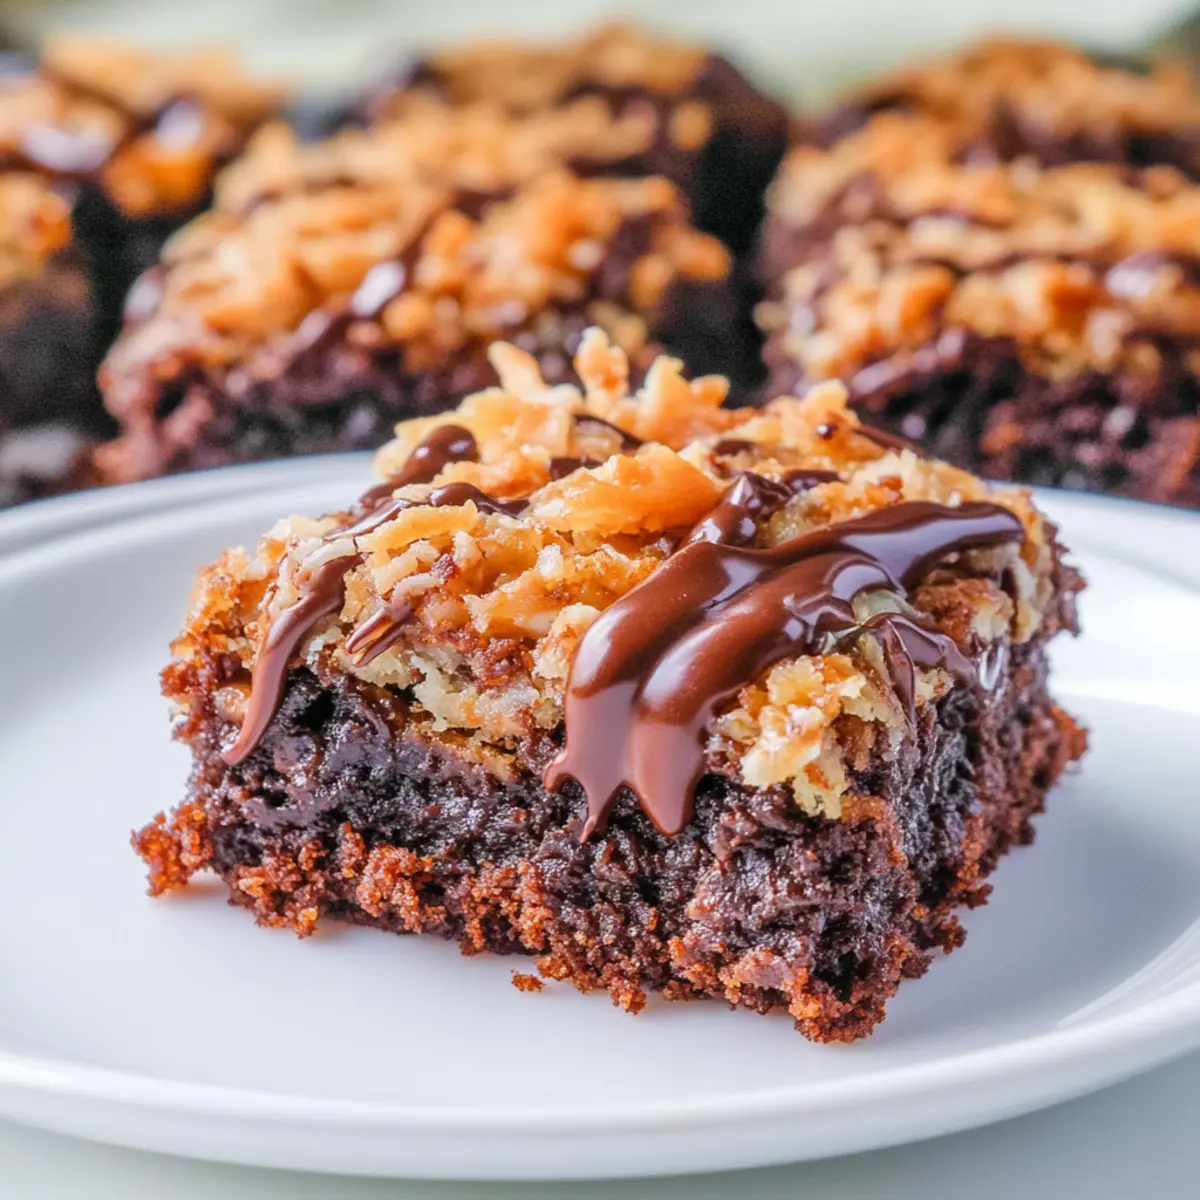
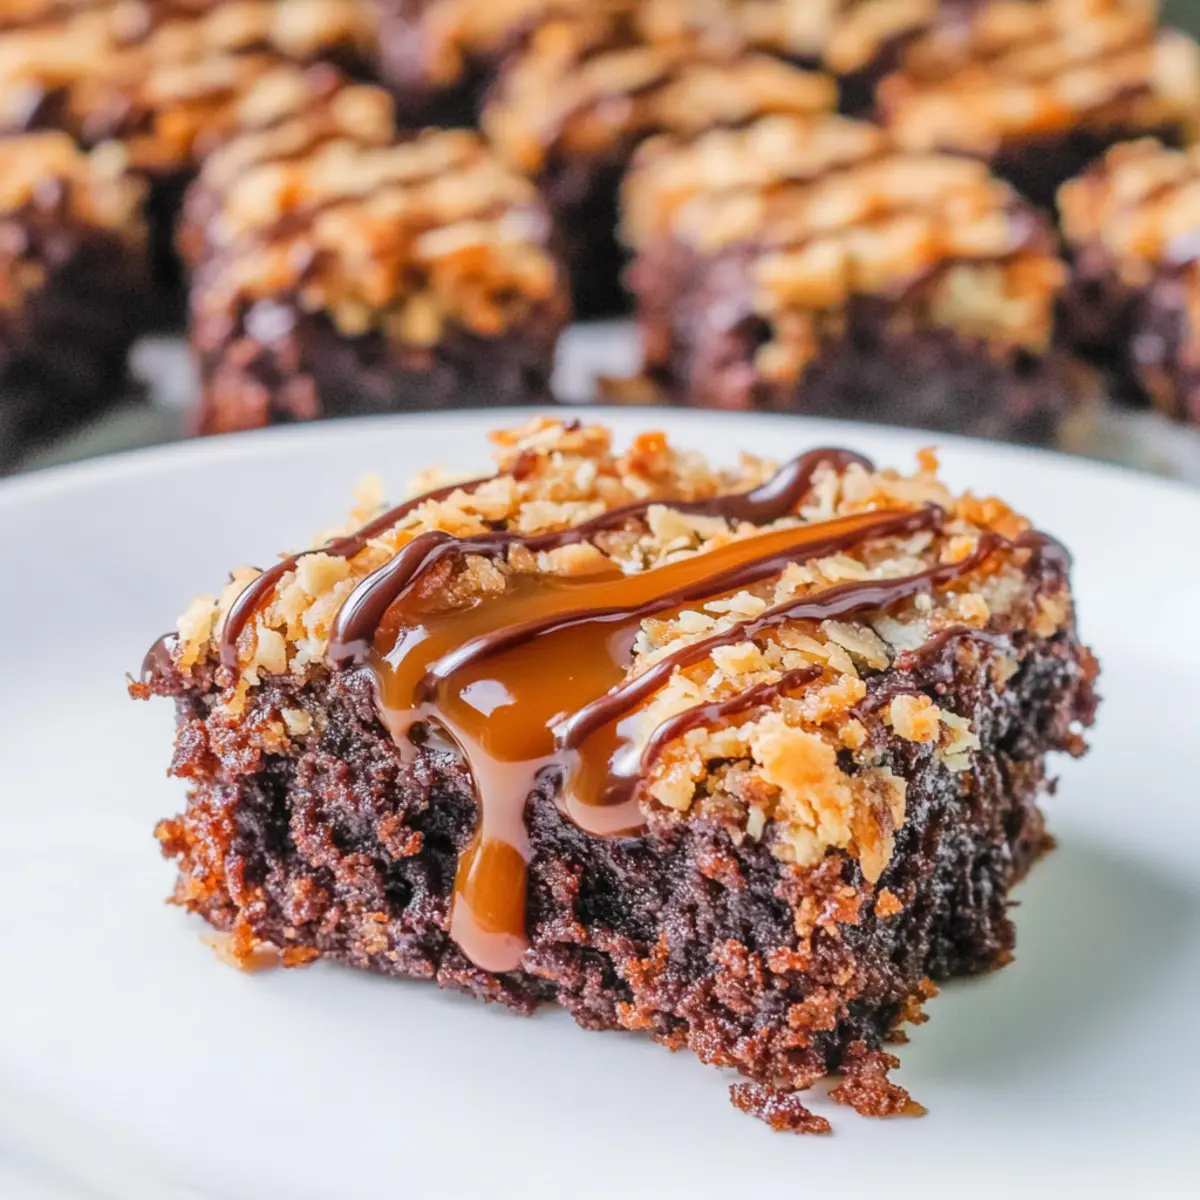
After the brownies have cooled, pour an even layer of caramel ice cream topping over the surface. Ensure the caramel covers the entire brownie base for maximum flavor in your Easy Samoa Brownies. With the gooey caramel in place, it’s time to add that delightful toasted coconut for extra texture.
Step 6: Garnish with Coconut
Sprinkle the toasted coconut evenly over the caramel layer, pressing it down gently to help it stick. This crunchy coconut element will bring that classic Samoa cookie flavor right to your brownies. Take a moment to admire how beautiful and appealing it looks before finishing off with the chocolate drizzle.
Step 7: Drizzle with Chocolate
In a microwave-safe bowl, melt semi-sweet chocolate chips in 30-second intervals, stirring in between until smooth. Once melted, drizzle the chocolate over the top of the brownies, creating an elegant pattern. This layer not only enhances the dessert’s visual appeal but also adds luscious chocolatey goodness to your Easy Samoa Brownies.
Step 8: Slice and Serve
Once the chocolate has set slightly, use a sharp knife to slice the brownies into squares. Cleaning the knife between cuts will help achieve clean edges for a professional look. Now that your Easy Samoa Brownies are beautifully sliced, they’re ready to be served and savored—enjoy the fruits of your delicious labor!
Expert Tips for Easy Samoa Brownies
-
Cool Completely: Ensure brownies are fully cooled before adding toppings. This prevents sliding and helps maintain the layered effect of your Easy Samoa Brownies.
-
Watch the Coconut: While toasting, keep a close eye on the shredded coconut to prevent burning. You’re aiming for a light golden color, which adds flavor and texture.
-
Use a Sharp Knife: For perfect, clean slices, use a sharp knife and wipe it between cuts. This will help you achieve those beautiful, uniform squares for your Easy Samoa Brownies.
-
Layering Technique: Pour the caramel evenly over the brownies while they’re still warm. This helps it spread better and adhere nicely to the brownie base.
-
Experiment with Flavors: Feel free to modify the toppings—swap chocolate chips for different flavors, or add nuts for extra crunch! Your Easy Samoa Brownies will be delicious each time.
-
Storage Secrets: Keep your brownies in an airtight container to maintain freshness. They can be stored at room temperature for 2-3 days or in the fridge for up to a week.
What to Serve with Easy Samoa Brownies
Imagine a gathering where the delightful aromas of chocolate and coconut fill the air, making your taste buds tingle with anticipation for an unforgettable dessert experience.
-
Vanilla Ice Cream: The creamy, cool sweetness of vanilla ice cream pairs perfectly with rich brownies, providing a delightful contrast in texture.
-
Fresh Berries: Juicy raspberries or strawberries add a refreshing burst of flavor, balancing the sweetness of the brownies and adding a pop of color to your plate.
-
Coffee: A warm cup of coffee complements the chocolatey richness while enhancing the flavors of the brownies; it’s a cozy pairing that feels just right.
-
Chocolate Sauce: Drizzling extra chocolate sauce on top intensifies the dessert’s richness and gives it that indulgent touch that chocolate lovers adore.
-
Coconut Whipped Cream: Light and fluffy, coconut whipped cream mirrors the flavors in the brownies; it’s an exotic twist that will leave everyone craving more.
-
Caramel Sauce: If you can’t get enough of that gooey goodness, serve a side of warm caramel sauce for dipping or drizzling, taking your brownies to the next level of decadence.
-
Nutty Ice Cream: Enjoy pairing your brownies with a scoop of nut-flavored ice cream, such as praline or pistachio, to add an exciting crunch and earthy flavor.
-
Milk: Don’t underestimate the comforting charm of a tall glass of milk! It beautifully balances the sweetness and ensures every bite is blissfully enjoyable.
Storage Tips for Easy Samoa Brownies
Room Temperature: Keep your brownies in an airtight container at room temperature for up to 3 days to maintain their fudgy texture and freshness.
Fridge: If you’re not enjoying them all right away, store the Easy Samoa Brownies in the refrigerator for up to a week. Just be sure to seal them well to prevent drying out.
Freezer: For longer storage, freeze the brownies in an airtight container or tightly wrapped in plastic wrap for up to 2-3 months. Flash-freezing individual squares can help maintain their texture.
Reheating: To enjoy them warm, microwave for 10-15 seconds or until just heated through, then add your favorite scoop of ice cream for an extra special treat!
Easy Samoa Brownies Variations
Feel free to explore these delightful twists on classic Easy Samoa Brownies that are sure to spark your creativity!
-
Nutty Crunch: Add chopped nuts like pecans or walnuts before baking to introduce an exciting crunch alongside the sweet layers.
-
Dark Chocolate Delight: Substitute semi-sweet chocolate chips with dark chocolate for a deep, rich flavor that perfectly complements the caramel and coconut.
-
Coconut Alternative: Try using toasted almond flakes instead of coconut for a different texture and a nutty twist that your taste buds will adore.
-
Peanut Butter Layer: Spread a layer of creamy peanut butter on top of the brownies before adding caramel for a rich, nutty sweetness that balances wonderfully.
-
Spicy Kick: Add a pinch of cayenne pepper to your brownie batter for an unexpected touch of heat that makes each bite enjoyable.
-
Creamy Cheesecake: Swirl in a cheesecake mixture on top of the brownie batter before baking for a decadent surprise every time you take a bite.
-
Vegan Version: Use a vegan brownie mix and swap eggs for applesauce. Top with coconut and a dairy-free caramel sauce for a delightful treat.
-
Flavor Reinvented: Replace the caramel layer with a rich layer of Nutella for a chocolatey twist that’s undeniably irresistible!
If you’re looking for more delicious ideas, try my Ricotta Pasta for a savory treat that perfectly complements your sweet creations.
Make Ahead Options
These Easy Samoa Brownies are absolutely perfect for meal prep! You can prepare the brownie base up to 24 hours in advance by baking it and letting it cool completely. Simply cover the cooled brownies tightly with plastic wrap or aluminum foil to keep them fresh. Additionally, you can toast the coconut a day ahead and store it in an airtight container to maintain its crunchiness. When you’re ready to serve, just pour the caramel topping over the brownies, sprinkle with coconut, drizzle with melted chocolate, and slice into squares. By prepping ahead of time, you’ll save precious moments during busy weeknights while still enjoying a treat that’s just as delicious as if you made it fresh!

Easy Samoa Brownies Recipe FAQs
What type of brownie mix should I use for Easy Samoa Brownies?
Absolutely! A standard boxed brownie mix works perfectly for these Easy Samoa Brownies. You can opt for any brand you love; just follow the package instructions for water, oil, and eggs. This simplifies the process and allows you to focus on adding those delicious toppings later!
How should I store my Easy Samoa Brownies?
To store your Easy Samoa Brownies, place them in an airtight container at room temperature for up to 3 days. If you want them to last longer, refrigerate them for up to a week. Just be sure to seal them well to prevent drying out. For longer storage, freeze the brownies in an airtight container or wrapped tightly in plastic wrap for up to 2-3 months.
Can I freeze Easy Samoa Brownies, and how?
The more the merrier! Freezing Easy Samoa Brownies is a great way to keep them on hand for later. To freeze:
- Allow the brownies to cool completely after baking.
- Cut them into squares and place them on a parchment-lined baking sheet in a single layer.
- Flash-freeze them for about an hour until firm.
- Then, transfer the frozen squares to an airtight container or a freezer bag, with parchment paper between layers to prevent sticking.
- Label and date the container, and they’ll be good for up to 2-3 months!
What if my toasted coconut burns?
Don’t worry; it happens to the best of us! If your coconut burns, it might not taste great, but it’s an easy fix. Just watch it closely next time, toasting it at 350°F (175°C) for only 3-5 minutes, stirring frequently until it turns a light golden brown. If burnt, you can always switch to fresh coconut or try using unsweetened coconut for a different, less sweet flavor.
Can I modify these brownies for dietary restrictions?
Very! If you have dietary restrictions, there are several modifications you can make. For a gluten-free version, look for a gluten-free brownie mix. If you want to avoid dairy, consider using a dairy-free caramel substitute and non-dairy chocolate chips. Always check the ingredient labels for any potential allergens specific to your needs, especially if sharing with friends or family.
Easy Samoa Brownies that Will Make Your Heart Melt
Ingredients
Equipment
Method
- Preheat your oven to 350°F (175°C). In a mixing bowl, combine the boxed brownie mix, water, vegetable oil, and eggs, following the package instructions. Whisk until smooth, ensuring no dry lumps remain.
- Pour the brownie batter into a greased 9x13-inch pan, spreading it evenly to the corners. Bake for about 30-35 minutes.
- While the brownies are baking, spread shredded coconut in a single layer on a parchment-lined baking sheet. Toast it in the oven for about 3-5 minutes, stirring frequently until it turns golden brown.
- Once baked, remove the brownies from the oven and let them cool in the pan on a wire rack for about 15 minutes.
- After the brownies have cooled, pour an even layer of caramel ice cream topping over the surface.
- Sprinkle the toasted coconut evenly over the caramel layer, pressing it gently.
- In a microwave-safe bowl, melt semi-sweet chocolate chips in 30-second intervals, stirring until smooth. Drizzle the chocolate over the top of the brownies.
- Once the chocolate has set slightly, slice the brownies into squares for serving.
Leave a Reply